
Network as a Service with Jenkins and Netfoundry
Background
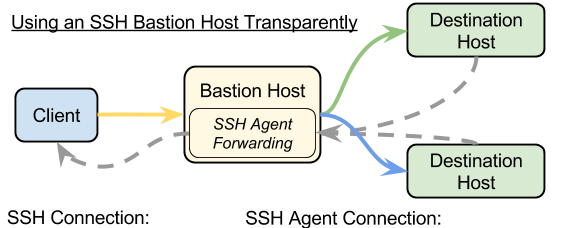
As a Devops engineer, one of the problems faced is how to gain secure access to servers behind a private zone. Servers are mainly put in the secured zone with access only granted from specific hosts to minimize potential of a security attack. The problem even gets more complex when most of what you need to connect to is hosted by a cloud provider such as AWS, Azure. Most of the solutions out there either involve having a VPN to connect to setup a secure connection or using a bastion host to tunnels connections through. These solutions are usually very static, slow and manual. The connections being static, also means they are always up even when not being used – which is not a good security practice. In many cases, such as when using a bastion host, exposing any other service other than SSH usually involves SSH tunneling which also has its own security implications.
I decided to try a different approach to solving this problem. What if I could spin up secure networks on demand from my client to a server behind a private zone? What if I could only expose the services that I needed to ensure that my network is not accidentally exploited? Once am not using the network, I would like the option to spin it down, until I need it again. And finally, I would like to integrate this into my automation tools like Jenkins.
The solution I arrived at was using the Netfoundry APIs and Jenkins to achieve this. Before we get into the general solution, I will take a minute to explain what the general building blocks of NaaS, Jenkins and Netfoundry are.
What is NaaS?
Network as a service (NaaS) is a business model for delivering wide area network services virtually. Configuring and operating routers and protocols, WAN optimization and other components, such as firewalls or software defined WAN endpoints, can be complicated. Netfoundry is able to abstract this complication and expose REST APIs to setup just what we need need from a network.
Jenkins
Jenkins is an open source automation server. Jenkins helps to automate the non-human part of the software development process, with continuous integration and facilitating technical aspects of continuous delivery. It is a server-based system that runs in servlet containers such as Apache Tomcat
High Level Design
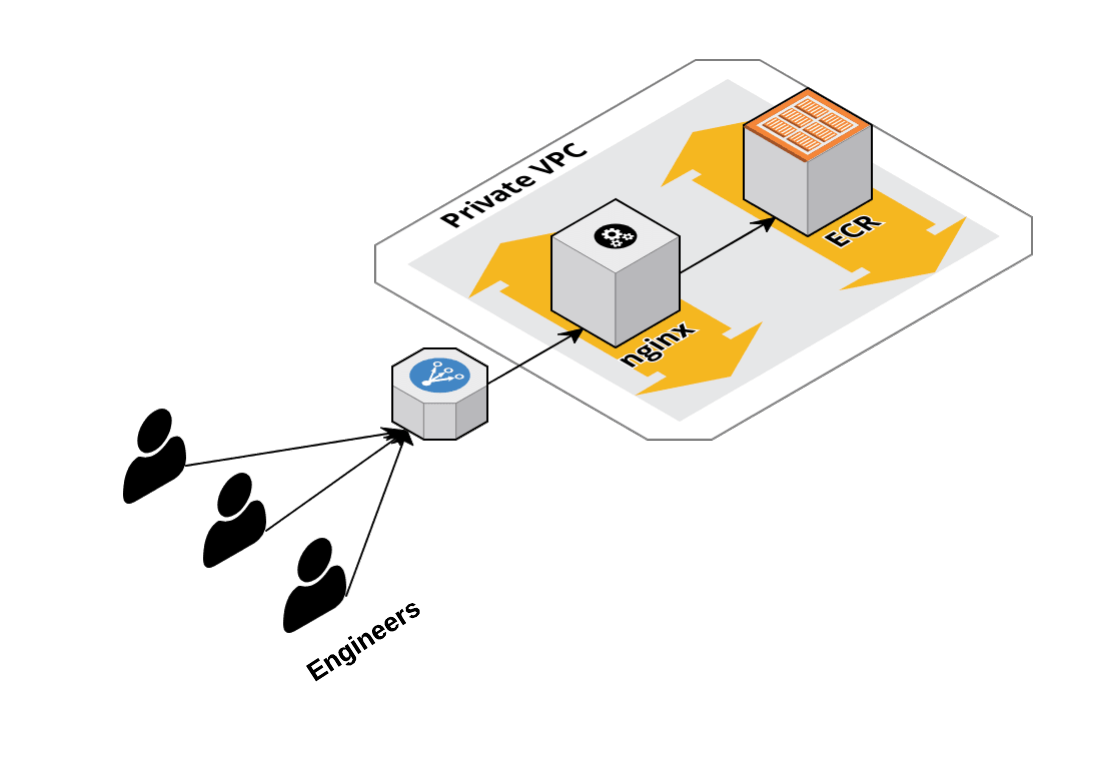
My end goal was to be able to reach an Nginx webserver which was sitting in a private VPC with a private address. The webserver serves as a front end for internal data which is sensitive in nature, should only be for internal consumption and shouldn’t be publicly accessible. I would use a Jenkins pipeline to call Netfoundry APIs to setup a secure network which would be used to connect to the Nginx webserver. By using an automation tool, I ensure this action is repeatable and I can spin the network up and down as I need.
Pipeline Explained
The Jenkins pipeline will walk through creating a network which allows access to the Nginx webserver explained in the previous section. The pipeline is written in Groovy calling the Netfoundry REST APIs to perform the needed actions. The steps below do a walkthrough of the different stages in the pipeline.

Stage 1: User Input
This step is meant to collect any variable information by the user. In this example, we are getting the name of the network. As a take-away, this step is optional, we can do away with this section all together by generating a network name directly from the pipeline.
stage('User Input') {
      input {
        message "Enter name of network"
        parameters {
          string(name:'network', defaultValue: '', description: 'Choose network name')
        }
      }
    }
Step 2: Login
Once the user input is done, the next step is to Login in to the Netfoundry API using credentials set up from the Netfoundry Console. Reference for Netfoundry API docs on authentication can be found here:- https://gateway.production.netfoundry.io/rest/v1/docs/index.html#authentication
stage('Login'){
      steps {
        script {
          access_token = getBearerToken(deploy_environment)
        }
      }
    }
Step 3: Create Network
Once successfully authenticated, next step will be to create a network. Again this is done with REST API calls to the Netfoundry API for create network (https://gateway.production.netfoundry.io/rest/v1/docs/index.html#resource-network-create). It is important to note that there are no app-wan on this network at the moment, so even after the network is created, it is not in position to carry traffic as yet, until an app-wan has been added. This process is an async process, so you will need to implement a method to keep checking on the network status to confirm its created before moving to the next stage.
stage('Create network') {
      steps {
        timeout(time: "${time_out}", unit: 'MINUTES') {
        script {
          println "Timeout:- ${time_out} minutes"
          def data = [
            "name": network_name,
            "organizationId": organizations[deploy_environment],
            "locationCode": locationcode
          ]

          data = [
              "name": network_name,
              "organizationId": "d06730a6-cf36-4eb5-a029-d073ca904d3d",
              "locationCode": locationcode,
              "productFamily": product_family,
              "productVersion": product_version
            ]
          }
        }
      }
    }
Step 4: Create Gateway
It is necessary to create a gateway within your internal VPC which would have access to the Nginx web server. This Gateway effectively acts as a proxy of the requests to the Nginx web server allowing it to be accessible from the network created in Step 3. This is precisely why this setup can replace the bastion host. Creating the network will spin up a Netfoundry controller ( control plane ) and Transfer Nodes ( used for carrying traffic from one point to another.)
stage('Create Gateway') {
          steps {
            timeout(time: "${time_out}", unit: 'MINUTES') {
            script {
              println "Timeout:- ${time_out} minutes"
              def data = [
              "name" : "Serving Gateway",
              "endpointType" : "GW",
              "dataCenterId": "c3b7c38b-6bc5-921e-0111-c3a7c2acc29d"
              ]
              def createResult = httpEndpoint(localendpoints, data, access_token, "POST")
              print createResult
              servingGWUrl = createResult["_links"]["self"]["href"]
              servingGWID = servingGWUrl.split("/")[8]
              servicesGwUrl = createResult["_links"]["services"]["href"]
            }
            script {
              waitForNetworkCreation(servingGWUrl, access_token, 400 )
            }
          }
        }
Step 5: Create Service
This is similar to opening up a firewall rule or Security Group access. Destination IP will be your Nginx server and any local IP which will be used as an intercept IP. Reference:- https://gateway.production.netfoundry.io/rest/v1/docs/index.html#resource-ip-host-service-create
stage('Create service') {
      steps {
        script {
          data = [
          "name": "Test service",
          "serviceClass": "CS",
          "serviceInterceptType": "IP",
          "endpointId": endpointID,
          "serviceType": "TCP",
          "interceptFirstPort": "80",
          "interceptIp": "10.1.1.1",
          "networkIp": "10.19.102.183",
          "networkFirstPort": "80",
          "networkLastPort": "80",
          "interceptLastPort": "80"
          ]
          def createResult = httpEndpoint(localservice, data, access_token, "POST")
          print createResult
          print "Links"
          testServiceUrl = createResult["_links"]["self"]["href"]
          serviceID = testServiceUrl.split("/")[8]
          // servicesGwUrl = createResult["_links"]["services"]["href"]
        }
      }
    }
Step 6: Create AppWan
Appwans effectively define how endpoints ( in this case the Netfoundry client on my laptop ) are permitted to access services. Each AppWAN is managed by a NetFoundry controller, enabling the administrator to benefit from NetFoundry’s network fabric without needing to manage the underlying network https://gateway.production.netfoundry.io/rest/v1/docs/index.html#resource-appwan-create
stage('Create AppWan') {
      steps {
        script {
          data = [
          "name": "Devops AppWan"
          ]
          def createResult = httpEndpoint(localappwans, data, access_token, "POST")
          print createResult
          print "Links"
          appWanServiceUrl  = createResult["_links"]["self"]["href"]
          gatewayFinal = createResult["_links"]["endpoints"]["href"]
          servicesFinal = createResult["_links"]["services"]["href"]
          // servicesGwUrl = createResult["_links"]["services"]["href"]
        }
      }
    }
Step 7: Attach Service to AppWan
The last step is to add the service to the app-wan created. Once this is done, my network has access to Nginx webserver. Last step is to login to the Netfoundry console and create a client to use for accessing this network. https://gateway.production.netfoundry.io/rest/v1/docs/index.html#resource-appwan-update
stage('Attach service to AppWan') {
      steps {
        script {
          data = [
          "ids": [serviceID]
          ]
          def createResult = httpEndpoint(servicesFinal, data, access_token, "POST")
          print createResult
          print "Links"
          appWanServiceUrl = createResult["_links"]["self"]["href"]

          // servicesGwUrl = createResult["_links"]["services"]["href"]
        }
      }
    }
Optional Step: Delete Network
This is an optional step to allow you cleanup once the network is not needed anymore. https://gateway.production.netfoundry.io/rest/v1/docs/index.html#resource-network-delete
stage('Delete') {
      steps {
        script {
          println "Timeout:- ${time_out} seconds"
          httpEndpoint endpoints: [localNetworkUrl], access_token: access_token, method: "DELETE"
        }
      }
    }
Conclusion
With this done, I was able to access to the Nginx webserver which was previously unreachable unless using a bastion host. It is important to note the key differences between using the Bastion host and using the Netfoundry network for this, and what makes the Netfoundry option out score the bastion host on almost all counts.
Using a Bastion Host
Using Netfoundry APIs and networks
Complicated and Static setup
Once the pipeline is automated, adding any additional services/access is trivial and can be done with minimal resources.
Exposes only SSH access
Only exposes required services and is very scalable.
Can pose a security risk, with practices like SSH Port forwarding.
Zero trust access to resources.
Alot of manual setup to expose new services/access
API enable simple, agile automation and adding new services/access is trivial
Here is the first draft of the video describing the above: