Install Ziti in Kubernetes
Let’s talk about using a Ziti network to expose your Kubernetes cluster services. This is a flexible approach to secure, controlled access to cluster services. With Ziti, you don’t need traditional alternatives like IP allow lists, virtual private networks, and bastion hosts. This also means your cluster could be anywhere it can reach out to the internet, and the master API server need not be exposed to the public internet. We’ll cover making the Kubernetes API itself private in the last section, if you’re interested in that.
You will install Ziti as a normal pod deployment on your Kubernetes cluster with a Helm chart. This pod will represent an endpoint in your Ziti network, and may then be granted permission to host any Ziti services. You’ll create Ziti services that describe the cluster services you wish to expose. For example, the Kubernetes API used by kubectl, a Kubernetes dashboard, or any pod, service, node domain name or IP.
Before you begin
- Install
kubectl, the command line interface for Kubernetes - Create a Kubernetes cluster with at least one worker node.
- Install Helm, the package manager for Kubernetes.
- Sign up for the free tier if you wish to use the NetFoundry console to orchestrate your Ziti network (easiest).
Create a Ziti Network
You will need a basic Ziti network to describe the services you wish to expose and to authorize clients to connect. Follow these steps to create a Ziti service for your Kubernetes master API server.
- In the NF web console, create a network. The network will be ready in a few minutes.
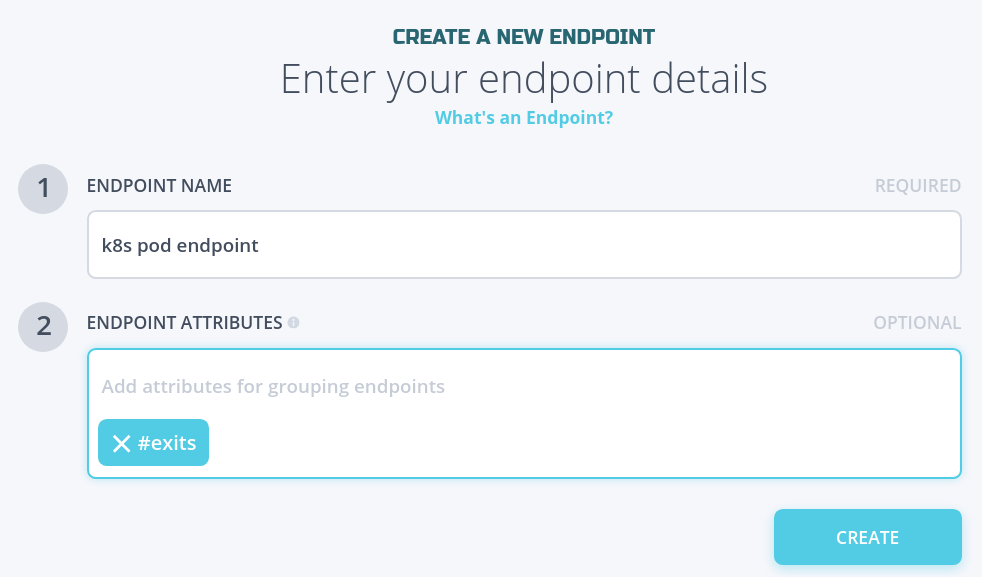
- In endpoints, create an endpoint named “k8s pod endpoint”, then open the endpoint details to download the enrollment token .jwt file to the computer where you will connect to the k8s API server with
kubectlandhelm. This will be used a little later when you install the Helm chart on your cluster.
- Create an endpoint named “my laptop”. This will be used to connect to any Kubernetes services you decide to expose. Download the enrollment token .jwt file to your laptop.
-
In Services, create a service for the hello web server.
The server domain name for the new service is “hello.default.svc”. Your ziti-host pod will use cluster DNS to resolve the service name in the default namespace.

- In AppWANs, create an AppWAN authorizing
#allendpoints to connect to#allservices. This is for simplicity’s sake and assumes you are the only operator of your network. You could instead define a more restrictive policy. - In edge routers, create an edge router in any data center, ideally near your laptop.
- In edge router policies, create a blanket edge router policy for #all endpoints to use #all edge routers.
- Install Ziti Desktop Edge on your laptop.
- In Ziti Desktop Edge, add the endpoint identity you downloaded i.e. “my laptop.jwt”.
Install Ziti with Helm
The Helm chart will create a normal Kubernetes deployment pod running the Ziti Linux tunneler which will be enrolled with your Ziti network using the token file you downloaded earlier i.e. “k8s pod endpoint.jwt”.
-
Add NetFoundry charts repo to Helm.
❯ helm repo add openziti https://openziti.github.io/helm-charts/ "openziti" has been added to your repositories -
Enroll the Identity
docker run --rm --volume /tmp:/mnt openziti/ziti-cli edge enroll "/mnt/k8s pod endpoint.jwt" -
Install the chart
 helm install ziti-host openziti/ziti-host --set-file zitiIdentity="/tmp/k8s pod endpoint.json"
 NAME: ziti-host
 LAST DEPLOYED: Mon Apr 26 12:19:05 2021
 NAMESPACE: default
 STATUS: deployed
 REVISION: 1
Congratulations! Ziti is now running behind the scenes in your cluster, and you may now expose any of your cluster services. Next, we’ll deploy a toy web app to expose with Ziti.
Expose Cluster Services with Ziti
You may expose your cluster’s services to your Ziti network.
-
Deploy a lightweight OpenZiti hello world web server on your cluster.
❯ helm install hello-netfoundry openziti/hello-toy --set serviceDomainName=hello NAME: hello LAST DEPLOYED: Sat May 1 19:33:21 2021 NAMESPACE: default STATUS: deployed REVISION: 1 TEST SUITE: None -
For the purposes of this exercise you may ignore the NOTES section that is always printed by Helm after a successful install.
-
Visit the hello server in the browser on your laptop!
Create a Private Cluster Context with Ziti
You may skip this section if you are not interested in making the Kubernetes API private
-
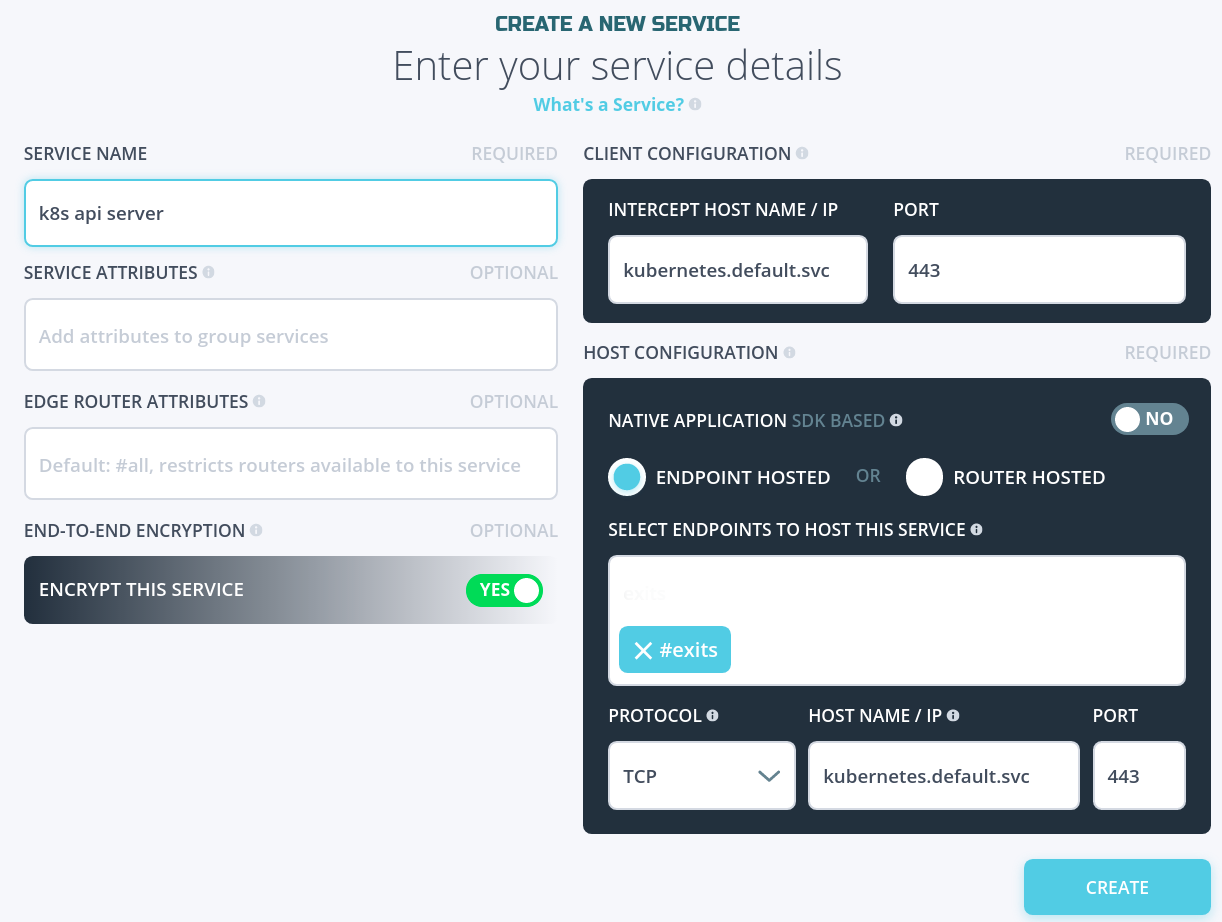
In NetFoundry console, in Services, create a service like “k8s api server” for https://kubernetes.default.svc:443 hosted by the endpoint you created earlier e.g. “k8s pod endpoint”. This host config URL reflects the cluster’s default namespace using cluster DNS.

https://kubernetes.default.svc:443 is typically the default URL for accessing the master API server from a pod.
 ❯ kubectl cluster-info
 Kubernetes control plane is running at https://kubernetes.default.svc:443
 CoreDNS is running at https://kubernetes.default.svc:443/api/v1/namespaces/kube-system/services/kube-dns:dns/proxy
Now your Ziti network is set up to allow your Ziti Desktop Edge app on your laptop to connect to your Kubernetes cluster. Next you will configure a new kubectl context to connect to the private URL with Ziti.
-
Find the master API server URL for the current
kubectlcontext. In my case it is the server for cluster “my-cluster”.❯ kubectl config view -o jsonpath='{.contexts[?(@.name == "'$(kubectl config current-context)'")].context.cluster}' my-cluster ❯ kubectl config view -o jsonpath='{.clusters[?(@.name == "my-cluster")].cluster.server}' https://129.159.89.193:6443 -
Find the name of the user for the current context
❯ kubectl config view -o jsonpath='{.contexts[?(@.name == "'$(kubectl config current-context)'")].context.user}' my-user -
Define a new
kubectlcluster “my-cluster-private”.This new cluster definition will have the private server URL with the same certificate authority as the current context.
# create the new cluster definition with private URL and same CA ❯ kubectl config set clusters.my-cluster-private.server https://kubernetes.default.svc:443 Property "clusters.my-cluster-private.server" set. # Learn how the current context's CA is known, by data or file path. In my case it is by data in "certificate-authority-data" ❯ kubectl config view -o jsonpath='{.clusters[?(@.name == "my-cluster")].cluster}' {"certificate-authority-data":"DATA+OMITTED","server":"https://129.159.89.193:6443"} # use certificate-authority-data or certificate-authority (file path) depending on which your current context is already using ❯ kubectl config set clusters.my-cluster-private.certificate-authority-data $(kubectl config view --raw -o jsonpath='{.clusters[?(@.name == "my-cluster")].cluster.certificate-authority-data}') Property "clusters.my-cluster-private.certificate-authority-data" set. # or, if your CA is known by a file ❯ kubectl config set clusters.my-cluster-private.certificate-authority $(kubectl config view --raw -o jsonpath='{.clusters[?(@.name == "my-cluster")].cluster.certificate-authority}') Property "clusters.my-cluster-private.certificate-authority" set. -
Create the private
kubectlcontext “my-context-private”.This new context will pair the same Kubernetes user with the newly-created private cluster definition.
❯ kubectl config set-context my-context-private --cluster my-cluster-private --user my-user Context "my-context-private" created. -
Switch to the new
kubectlcontext❯ kubectl config use-context my-context-private Switched to context "my-context-private". ❯ kubectl get pods NAME READY STATUS RESTARTS AGE ziti-host-dfcb98fcd-l7rcr 1/1 Running 0 29m
This demonstrates that you are able to connect to your Kubernetes cluster’s master API server via Ziti, and so you could at this point disable the public cluster API endpoint and continue normally!
Troubleshooting
If you made an adjustment to your Ziti network and you’re waiting for the pod endpoint to notice then you might reduce the delay by deleting the pod. This will cause Kubernetes to re-create the pod, and you will not need to re-install the chart.
❯ kubectl get pods
NAME                        READY   STATUS    RESTARTS   AGE
ziti-host-dfcb98fcd-vjlww   1/1     Running   0          27m

❯ kubectl delete pod ziti-host-dfcb98fcd-vjlww
pod "ziti-host-dfcb98fcd-vjlww" deleted
You may also inspect the endpoint tunneler ziti-tunnel log messages for clues if it is not working. An error like “NO_EDGE_ROUTERS_AVAILABLE” could mean you did not create the blanket edge router policy when you set up your Ziti network.
❯ kubectl logs ziti-host-dfcb98fcd-vjlww | tail -
{"error":"unable to create apiSession. http status code: 400, msg: {\"error\":{\"code\":\"NO_EDGE_ROUTERS_AVAILABLE\",\"message\":\"No edge routers are assigned and online to handle the requested connection\",\"requestId\":\"fk7Gl3Isj\"},\"meta\":{\"apiEnrolmentVersion\":\"0.0.1\",\"apiVersion\":\"0.0.1\"}}\n","file":"/home/runner/go/pkg/mod/github.com/openziti/sdk-golang@v0.15.43/ziti/ziti.go:1187","func":"github.com/openziti/sdk-golang/ziti.(*listenerManager).createSessionWithBackoff","level":"error","msg":"failed to create bind session for service echo-1691-50050","time":"2021-05-01T18:08:34Z"}
